Ever notice how some augmented reality apps can pin specific 3D objects on the ground? Many AR games and apps can accurately plant various 3D characters and objects on the ground in such a way that, when we look down upon them, the objects appear to be entirely pinned to the ground in the real world. If we move our smartphone around and come back to those spots, they're still there.
In this tutorial, you'll learn how to make your augmented reality app for iPads and iPhones do that as well with ARKit. Specifically, we'll go over how we can place patches of grass all around us and make sure the virtual grass stays pinned to those spots.
What Will You Learn?
We'll be learning how to detect horizontal planes (geometric flat planes) on our iPad or iPhone. We'll also get some help using the hitTest to map 2D points (x, y) on our devices to real-world 3D points (x, y, z).
Minimum Requirements
- Mac running macOS 10.13.2 or later.
- Xcode 9.2 or above.
- A device with iOS 11+ on an A9 or higher processor. Basically, the iPhone 6S and up, the iPad Pro (9.7-inch, 10.5-inch, or 12.9-inch; first-generation and second-generation), and the 2017 iPad or later.
- Swift 4.0. Although Swift 3.2 will work on Xcode 9.2, I strongly recommend downloading the latest Xcode to stay up to date.
- An Apple Developer account. However, it should be noted that you don't need a paid Apple Developer account. Apple allows you to deploy apps on a test device using an unpaid Apple Developer account. That said, you will need a paid Developer account in order to put your app in the App Store. (See Apple's site to see how the program works before registering for your free Apple Developer account.)
Download the Assets You Will Need
To make it easier to follow along with this tutorial, I've created a folder with a few images, a scene file, and a Swift file. These files will make sure you won't get lost in this guide, so download the zipped folder containing the assets and unzip it.
Set Up the AR Project in Xcode
If you're not sure how to do this, follow Step 2 in our article on piloting a 3D plane using hitTest to set up your AR project in Xcode. Be sure to give your project a different name such as NextReality_Tutorial2. Make sure to do a quick test run before continuing on with the tutorial below.
Import Assets into Your Project
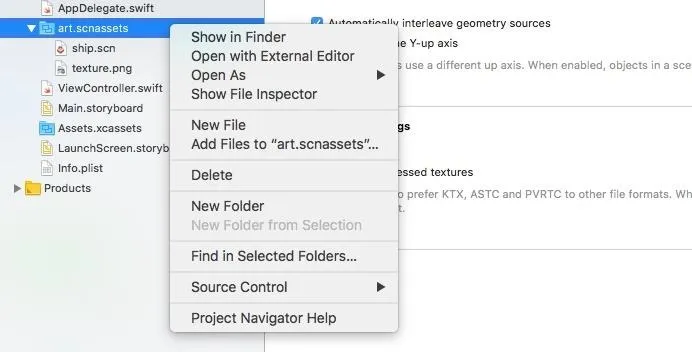
In your Xcode project, go to the project navigator in the left sidebar. Right-click on the "art.scnassets" folder, which is where you will keep your 3D SceneKit format files, then select the "Add Files to 'art.scnassets'" option. Add the "grass.scn" and "petal.jpg" files from the unzipped "Assets" folder you download in Step 1 above.
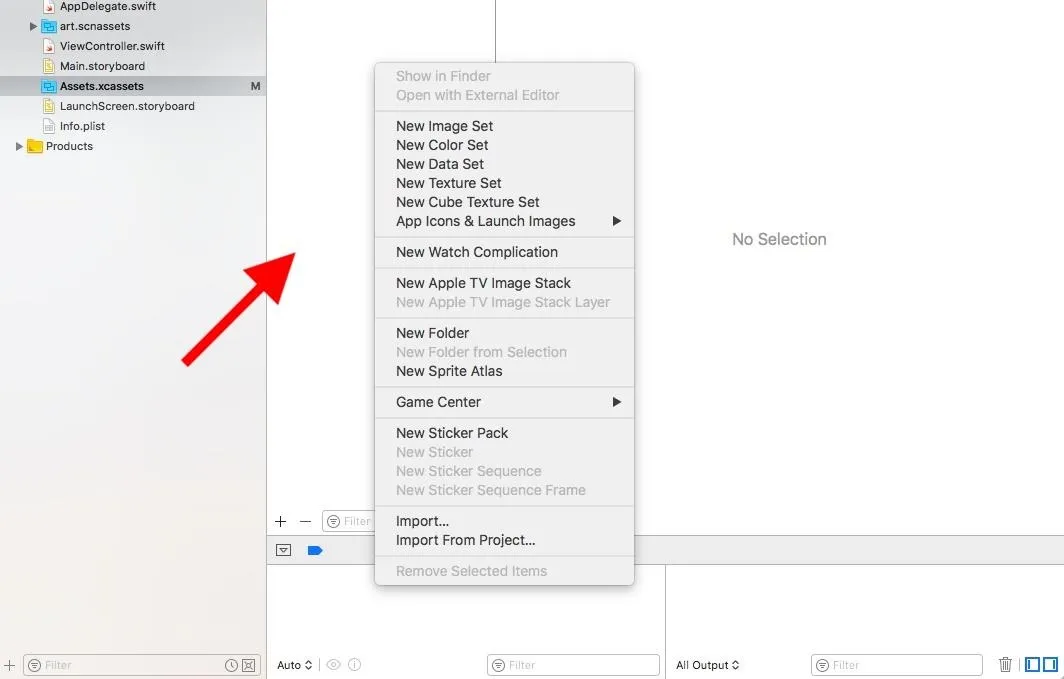
Next, in the project navigator, click on the "Assets.xcassets" folder, which is where you keep all your image files, then right-click in the left pane of the white editor area to the right of the navigator sidebar. Choose "Import," then add the other file ("overlay_grid.png") from the unzipped "Assets" folder.
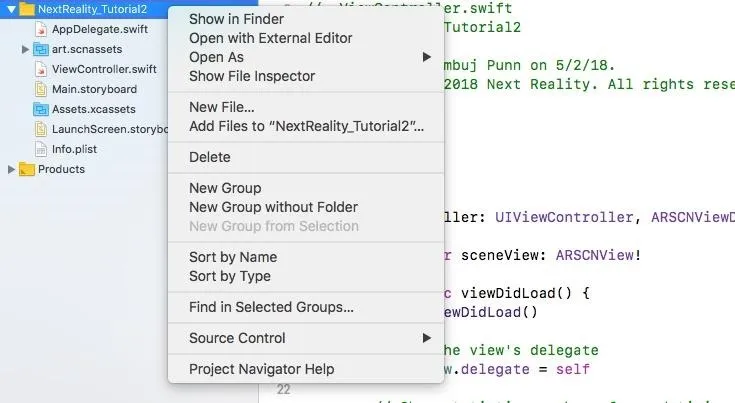
Again, in the project navigator, right-click on the yellow folder for "NextReality_Tutorial2" (or whatever you named your project). Choose the "Add Files to 'NextReality_Tutorial2'" option.
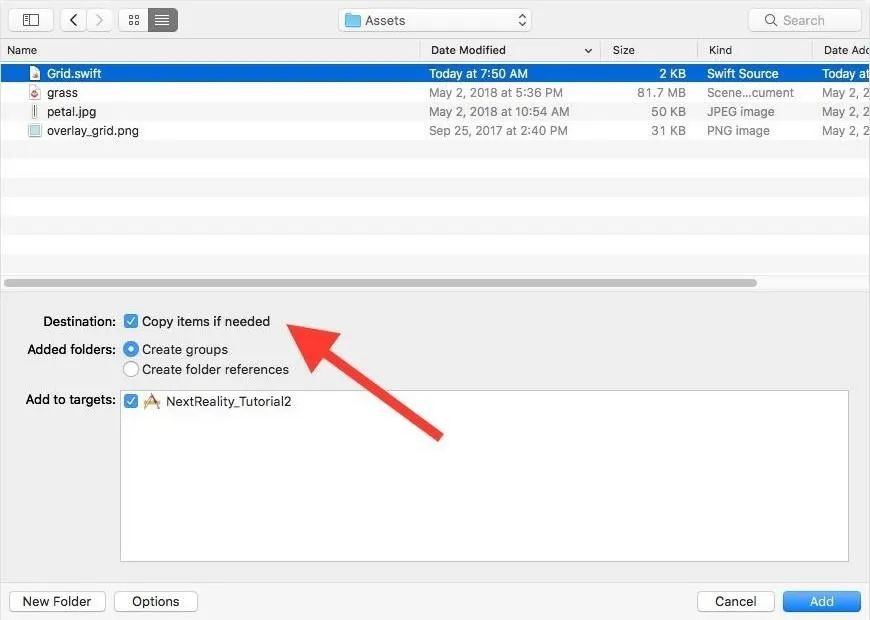
Navigate to the unzipped "Assets" folder, and choose the "Grid.swift" file. Make sure to check "Copy items if needed" and leave everything else as is. Click on "Add."
"Grid.swift" should be added into your project, and your project navigator should look something like this:
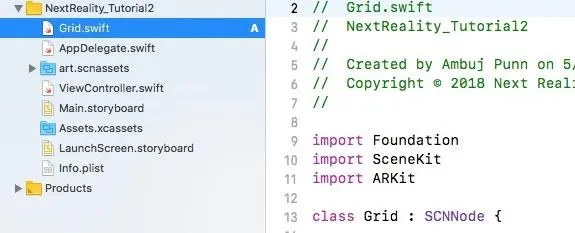
This file will help us display a blue 2D grid whenever our app detects a horizontal plane.
Place a Grid on Any Horizontal Plane ARKit Detects
When we say horizontal "planes," we mean horizontal geometric planes. Anything flat in our world is a plane. ARKit is able to detect this infinite number of planes through its World Tracking capabilities.
Open the "ViewController.swift" class by double-clicking it. The rest of this tutorial will be editing this document. If you want to follow along with the final Step 4 code, just open that link to see it on GitHub (you can also view the original code before any edits were made, for comparison).
In the "ViewController.swift" file, modify the scene creation line in the viewDidLoad() method. Change it from:
let scene = SCNScene(named: "art.scnassets/ship.scn")!To the following, which ensures we are not creating a scene with the old ship model.
let scene = SCNScene()Now, find this line at the top of the file:
@IBOutlet var sceneView: ARSCNView!Right under that line, add this line to create an array of "Grid" objects:
var grids = [Grid]()Copy and paste the following two methods as listed below to the end of the file before the last curly bracket ( } ) in the file.
Please note that in this code, and in future code, where there is a // followed by a number, this is for reference to the explanation right below the code box. Otherwise, when copying/pasting, those // lines should be empty lines.
// 1.
func renderer(_ renderer: SCNSceneRenderer, didAdd node: SCNNode, for anchor: ARAnchor) {
    let grid = Grid(anchor: anchor as! ARPlaneAnchor)
    self.grids.append(grid)
    node.addChildNode(grid)
}
// 2.
func renderer(_ renderer: SCNSceneRenderer, didUpdate node: SCNNode, for anchor: ARAnchor) {
    let grid = self.grids.filter { grid in
        return grid.anchor.identifier == anchor.identifier
        }.first

    guard let foundGrid = grid else {
        return
    }

    foundGrid.update(anchor: anchor as! ARPlaneAnchor)
}
Let's examine this code:
Both of these methods are methods that ARSCNViewDelegate supports. The first (1) method is called when a new node has been mapped to the given anchor. The second (2) method is called when a node will be updated with data from the given anchor.
- In the didAdd() method, we create a Grid instance mapped to that specific ARPlaneAnchor instance that ARKit has detected and added it into the grids array. We then add this instance to the specified SCNNode supplied by this method so the new Grid instance is part of the scene.
- In the didUpdate() method, we capture the specific Grid instance in the grids array that matches the updated anchor. We then update this Grid instance to the updated ARPlaneAnchor instance that ARKit has detected, allowing our grid to continue to expand.
Next, let's allow our ARKit application to detect horizontal planes. Under this line in viewWillAppear():
let configuration = ARWorldTrackingConfiguration()Add the following. Note: This line is very crucial for our horizontal planes to be detected!
configuration.planeDetection = .horizontalWe are enabling horizontal plane detection with this code. The ARWorldTrackingConfiguration instance called configuration allows six degrees of freedom tracking of the device. World tracking gives your device the ability to track and pin objects in the real world. Once we enable horizontal plane detection, it lets the world tracking know to detect horizontal flat geometric planes in the real world using our camera.
ARKit is able to do this without having you do any computer vision math and code. Usually, this would require you to be able to parse the images detected by your camera every frame and run complex computer vision algorithms to find out if it is a horizontal plane or not. ARKit does this with simply one line. Cool, right?
Finally, let's enable feature points. Under this line in viewDidLoad():
sceneView.showsStatistics = trueAdd this line:
sceneView.debugOptions = ARSCNDebugOptions.showFeaturePointsThis will allow yellow feature points to be displayed when ARKit detects them with the camera.
Run your app on your phone and walk around. Focus your device on the ground (it helps if your floor is well textured and well lit), and you should start seeing yellow feature points and eventually a blue grid being placed. This blue grid will continue to expand if you move or detect newer grids in different places (they represent the horizontal planes ARKit is able to detect).
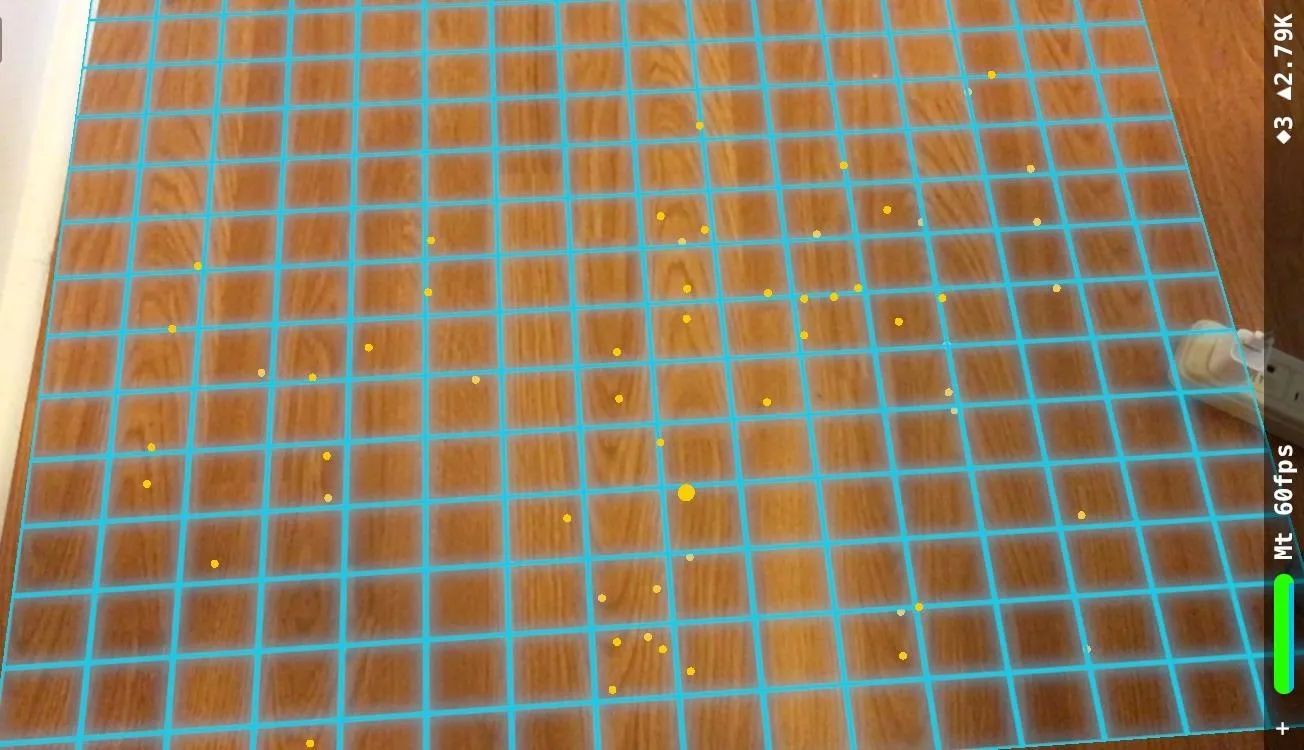
Checkpoint: Your entire project at the conclusion of this step should look like the final Step 4 code on my GitHub.
Place Grass in the Real World by Using hitTest
Apple's hitTest is a way for ARKit to map out a 2D point on our iPad or iPhone screen to the corresponding 3D point in the real world. Take a look at our hitTest tutorial for a thorough understanding of how hitTest works. If you want to follow along with the final Step 5 code as you input the content below, follow the GitHub link to do so.
Add a gesture recognizer to the end of the viewDidLoad() method, which adds a touch event to our view controller. Every time a tap happens, the tapped() method is called.
let gestureRecognizer = UITapGestureRecognizer(target: self, action: #selector(tapped))
sceneView.addGestureRecognizer(gestureRecognizer)
Now, add the tapped() method at the end of the file but before the last curly bracket:
// 1.
@objc func tapped(gesture: UITapGestureRecognizer) {
    // Get exact position where touch happened on screen of iPhone (2D coordinate)
    let touchPosition = gesture.location(in: sceneView)
// 2.
    let hitTestResult = sceneView.hitTest(touchPosition, types: .featurePoint)

    if !hitTestResult.isEmpty {

        guard let hitResult = hitTestResult.first else {
            return
        }

        addGrass(hitTestResult: hitResult)
    }
}
Let's examine each one of these steps:
- We get the exact position where the touch happens on the screen. This is stored as a CGPoint instance containing the (x, y) coordinates.
- We call the scene view's hitTest() by passing in the touchPosition, as well as the type of hitTest we want conducted: using feature points. We then call the addGrass() method by passing in the hitTestResult (we'll get to that in the next step).
Now, copy and paste the addGrass() below the tapped() but before the last curly bracket as listed below:
// 1.
func addGrass(hitTestResult: ARHitTestResult) {
    let scene = SCNScene(named: "art.scnassets/grass.scn")!
    let grassNode = scene.rootNode.childNode(withName: "grass", recursively: true)
    grassNode?.position = SCNVector3(hitTestResult.worldTransform.columns.3.x,hitTestResult.worldTransform.columns.3.y, hitTestResult.worldTransform.columns.3.z)
// 2.
    self.sceneView.scene.rootNode.addChildNode(grassNode!)
}
Let's examine each one of these steps:
- We upload the "grass.scn" file we imported into our project into this SCNScene object. We then place that 3D grass object (grassNode) at the specified hitTest result with the x, y, z coordinates.
- We then add this node to our ARSCNView.
Click the play button to build and run the app again. Once deployed, tap anywhere there is a feature point to place the 3D grass object. You can place as many as you want, but take a note that right now these grass objects can be placed anywhere, not just on horizontal planes. We'll tackle that in the next step.
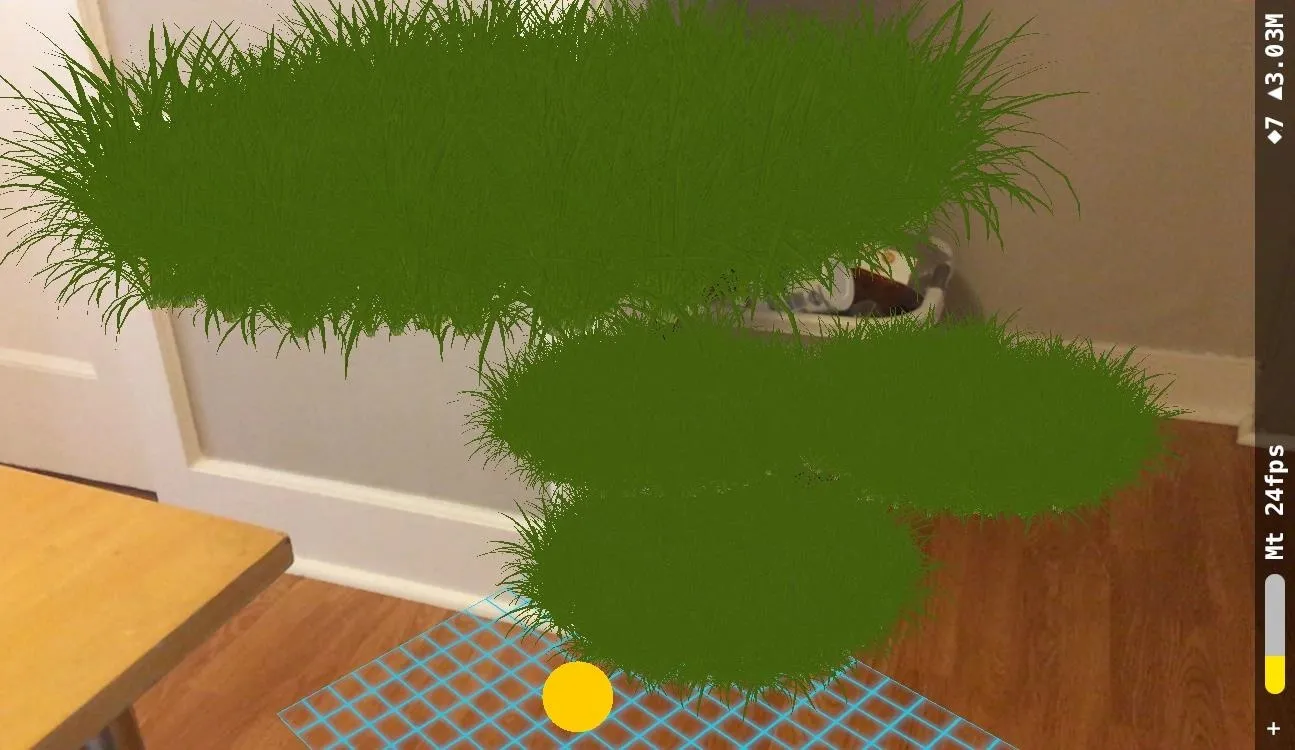
Checkpoint: Your entire project at the conclusion of this step should look like the final Step 5 code on my GitHub.
Place Grass on Horizontal Planes Detected by World Tracking
Here, we will make sure our grass is only planted (no pun intended) on detected horizontal planes, rather than anywhere, like before. If you want to follow along with the final Step 6 code as you input the content below, follow the GitHub link to do so.
Modify the hitTest so that, instead of detecting feature points, it detects planes. In tapped(), change this line from:
let hitTestResult = sceneView.hitTest(touchPosition, types: .featurePoint)To this:
let hitTestResult = sceneView.hitTest(touchPosition, types: .existingPlaneUsingExtent)Notice how we changed the type of the hitTest here? The existingPlaneUsingExtent allows hitTest to map out the 2D points on your screen only to the 3D points on an existing plane. This way, by tapping anywhere else other than a horizontal plane, the grass object will not be added into the scene.
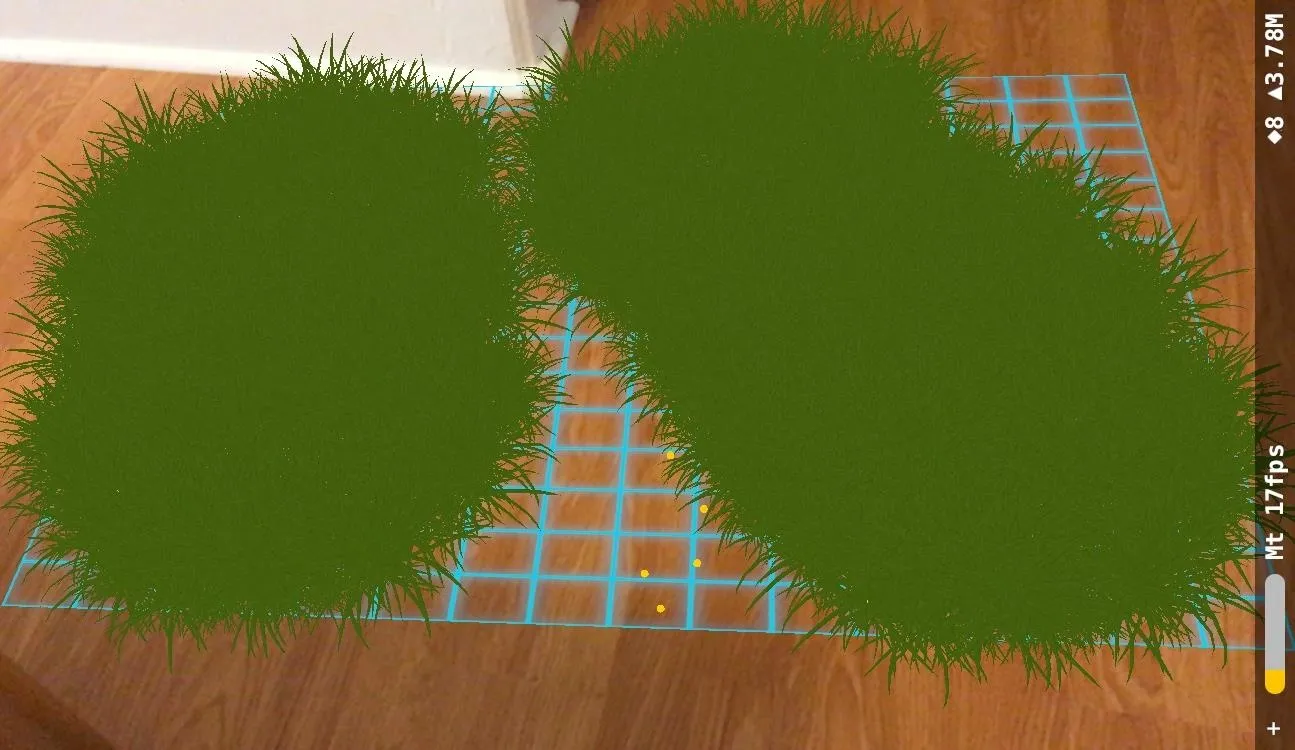
Run the app and, after detecting a horizontal plane, try tapping on the blue grid. It should look something like this:
How about we remove the blue grid to make the grass look a bit less animated on the ground? The horizontal planes will still continue to be detected based on what we did in Step 4, but the blue grids representing them won't be shown on the ground anymore.
Go back to the didAdd() and didUpdate() methods we added in Step 4 and comment out all the code in them like this:
func renderer(_ renderer: SCNSceneRenderer, didAdd node: SCNNode, for anchor: ARAnchor) {
    /*
    let grid = Grid(anchor: anchor as! ARPlaneAnchor)
    self.grids.append(grid)
    node.addChildNode(grid)*/
}

func renderer(_ renderer: SCNSceneRenderer, didUpdate node: SCNNode, for anchor: ARAnchor) {
    /*
    let grid = self.grids.filter { grid in
        return grid.anchor.identifier == anchor.identifier
        }.first

    guard let foundGrid = grid else {
        return
    }

    foundGrid.update(anchor: anchor as! ARPlaneAnchor)*/
}
This just invalidates our code for adding the blue grids wherever the horizontal planes were detected.
Now, run the app again. You won't be able to see any blue grids anymore, but you can rest assured that the horizontal planes are still being detected. When you have a group of feature points detected on the ground, try tapping in that space and you should be able to place grass there. At this point, you can continue to place grass anywhere on the ground (or anything flat, so that means a table as well) without having to see the blue grids. Your finished app should looking something like this:
Checkpoint: Your entire project at the conclusion of this step should look like the final Step 6 code on my GitHub.
What We've Accomplished
Great job, you were successfully able to plant grass on the ground all around you. If you followed all the steps, you should have been able to get to the correct result.
Let's quickly go over what you learned from this tutorial: Detecting horizontal geometric planes in the world; using the "hitTest" to map out 3D points on these horizontal planes from the 2D points we get by tapping on our iPads and iPhones; and placing 3D models at specific 3D real-world horizontal planes.
If you need the full code for this project, you can find it in my GitHub repo. I hope you enjoyed this how-to on ARKit. If you have any comments or feedback, please feel free to leave it in the comments section. Happy coding!
- Follow Next Reality on Facebook, Twitter, Instagram, and YouTube
- Sign up for our new Next Reality newsletter
- Follow WonderHowTo on Facebook, Twitter, Pinterest, and Google+
Cover image and screenshots by Ambuj Punn/Next Reality


Comments
Be the first, drop a comment!