


Have you been noticing SpaceX and its launches lately? Ever imagined how it would feel to launch your own rocket into the sky? Well, imagine no longer!
In this tutorial, you'll learn how to make a simple augmented reality app for iPads and iPhones by using ARKit. Specifically, we'll go over how we can launch a rocket into the sky and ensure that it keeps flying based on "world tracking."
What Will You Learn?
We'll be learning how to animate 3D objects in the AR world based on real world physical constraints. We'll also get some help by using the hitTest and plane detection details we covered previously.
Minimum Requirements
- Mac running macOS 10.13.2 or later.
- Xcode 9.2 or above.
- A device with iOS 11+ on an A9 or higher processor. Basically, the iPhone 6S and up, the iPad Pro (9.7-inch, 10.5-inch, or 12.9-inch; first-generation and second-generation), and the 2017 iPad or later.
- Swift 4.0. Although Swift 3.2 will work on Xcode 9.2, I strongly recommend downloading the latest Xcode to stay up to date.
- An Apple Developer account. However, it should be noted that you don't need a paid Apple Developer account. Apple allows you to deploy apps on a test device using an unpaid Apple Developer account. That said, you will need a paid Developer account in order to put your app in the App Store. (See Apple's site to see how the program works before registering for your free Apple Developer account.)
Download the Assets You Will Need
To make it easier to follow along with this tutorial, I've created a folder with the required 2D and 3D assets needed for the project. These files will make this guide easier to follow and understand, so download the zipped folder containing the assets and unzip it.
Set Up the AR Project in Xcode
If you're not sure how to do this, follow Step 2 in our article on piloting a 3D plane using hitTest to set up your AR project in Xcode. Be sure to give your project a different name, such as NextReality_Tutorial3. Make sure to do a quick test run before continuing on with the tutorial below.
Import Assets into Your Project
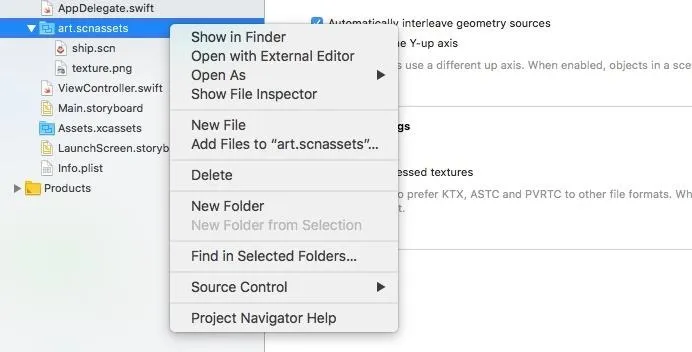
In your Xcode project, go to the project navigator in the left sidebar. Right-click on the "art.scnassets" folder, which is where you will keep your 3D SceneKit format files, then select the "Add Files to 'art.scnassets'" option. Add the following files from the unzipped "Assets" folder you download in Step 1 above: "rocket.scn," "fire.scnp," "smoke.scnp," "smoke.png," "spark.png." (Note: Do not delete the "texture.png" file that comes with the project.)
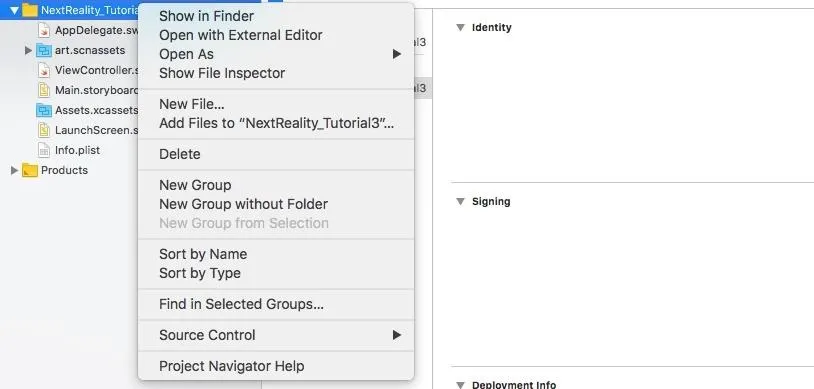
Again, in the project navigator, right-click on the yellow folder for "NextReality_Tutorial3" (or whatever you named your project). Choose the "Add Files to 'NextReality_Tutorial3'" option.
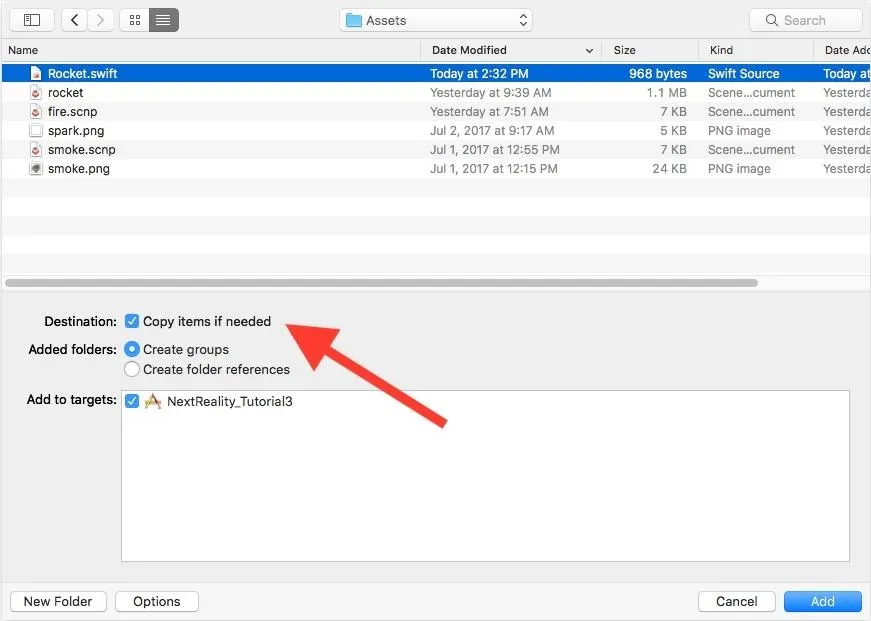
Navigate to the unzipped "Assets" folder, and choose the "Rocket.swift" file. Make sure to check "Copy items if needed" and leave everything else as is. Then, click on "Add."
"Rocket.swift" should be added into your project, and your project navigator should look something like this:

This file will take care of rendering the rocket and the smoke/fire particle system.
Turn on Horizontal Plane Detection
To quickly go over ARKit's plane detection capabilities, take a look at our tutorial on horizontal plane detection.
Open the "ViewController.swift" class by double-clicking it. The rest of this tutorial will be editing this document. If you want to follow along with the final Step 4 code, just open that link to see it on GitHub.
In the "ViewController.swift" file, modify the scene creation line in the viewDidLoad() method. Change it from:
let scene = SCNScene(named: "art.scnassets/ship.scn")!To the following (which ensures that we're not creating a scene with the old ship model):
let scene = SCNScene()Now, let's enable feature points. Under this line in viewDidLoad():
sceneView.showsStatistics = trueAdd the following:
sceneView.debugOptions = ARSCNDebugOptions.showFeaturePointsNext, let's turn on horizontal plane detection. Under this line in viewWillAppear():
let configuration = ARWorldTrackingConfiguration()Then add the following:
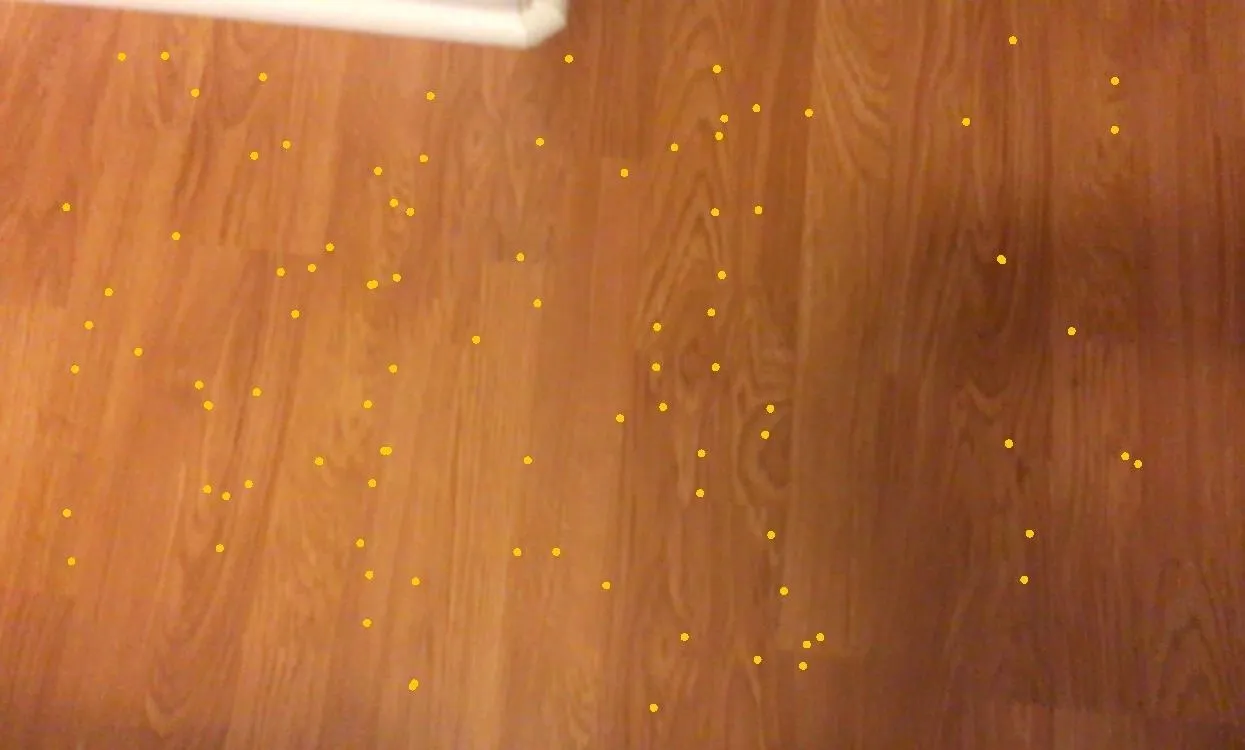
configuration.planeDetection = .horizontalThis will make sure ARKit is able to detect horizontal, flat geometric planes in the real world. The feature points will allow us to see all the 3D points ARKit is able to detect.
Run your app on your phone and walk around. Focus on a well lit area on the ground, and you should be able to see yellow feature points like this:
Checkpoint: Your entire project at the conclusion of this step should look like the final Step 4 code on my GitHub.
Place a Rocket on the Ground Using hitTest
Take a look at our hitTest tutorial for a thorough understanding of how hitTest works. Feel free to follow along with the final Step 5 code as you input the content below.
In this step we'll add a gesture recognizer to the end of the viewDidLoad() method, which adds a touch event to our view controller. Every time a tap happens, the tapped() method is called.
let gestureRecognizer = UITapGestureRecognizer(target: self, action: #selector(tapped))
sceneView.addGestureRecognizer(gestureRecognizer)
Now, add the tapped() method at the end of the file but before the last curly bracket:
@objc func tapped(gesture: UITapGestureRecognizer) {
    // Get 2D position of touch event on screen
    let touchPosition = gesture.location(in: sceneView)

    // Translate those 2D points to 3D points using hitTest (existing plane)
    let hitTestResults = sceneView.hitTest(touchPosition, types: .existingPlane)

    guard let hitTest = hitTestResults.first else {
        return
    }

    addRocket(hitTest)
}
We make sure to conduct a hitTest() with the touchPosition of the tapped gesture using the existing plane. This makes sure that the hitTest results we get back are from an existing plane rather than any random feature point. Once we've detected the correct hitTest result, we call the addRocket() to place the rocket in that specific point.
Now, copy and paste the addRocket() below the tapped(), but before the last curly bracket as listed below:
func addRocket(_ hitTest: ARHitTestResult) {
    let scene = SCNScene(named: "art.scnassets/rocket.scn")
    let rocketNode = Rocket(scene: scene!)
    rocketNode.name = "Rocket"
    rocketNode.position = SCNVector3(hitTest.worldTransform.columns.3.x, hitTest.worldTransform.columns.3.y, hitTest.worldTransform.columns.3.z)

    sceneView.scene.rootNode.addChildNode(rocketNode)
}
We load the rocket scene file and then use the Rocket class to create a rocketNode object. The Rocket.swift class we imported takes care of rendering the rocket and its smoke particle generator. We then simply name the rocketNode and position it to the specified hitTest location.
Click the play button to build and run the app again. Once deployed, walk around in a well lit area and detect as many feature points as you can on the ground. Tap around a group of detected feature points to place the 3D rocket object. Notice how the smoke particles (should) start rising from the tail of the rocket.
Checkpoint: Your entire project at the conclusion of this step should look like the final Step 5 code on my GitHub.
Add Animation & Physics Effects to the Rocket
Here, we'll add effects that will allow our rocket to be launched and continue to fly upwards with fire being emitted from its tail. Feel free to follow along with the final Step 6 code as you input the content below.
First, we'll add a double tap gesture recognizer. At the end of viewDidLoad() and after the gesture recognizer from step 5, add the following code:
let doubleTapGestureRecognizer = UITapGestureRecognizer(target: self, action: #selector(doubleTapped))
doubleTapGestureRecognizer.numberOfTapsRequired = 2
gestureRecognizer.require(toFail: doubleTapGestureRecognizer)
sceneView.addGestureRecognizer(doubleTapGestureRecognizer)
This adds the double tap gesture to trigger the launch of the rocket.
Next, add the doubleTapped() at the end of the file, but before the last curly bracket:
@objc func doubleTapped(gesture: UITapGestureRecognizer) {
    // Get rocket and smoke nodes
    guard let rocketNode = sceneView.scene.rootNode.childNode(withName: "Rocket", recursively: true) else {
        fatalError("Rocket not found")
    }

    guard let smokeNode = rocketNode.childNode(withName: "smokeNode", recursively: true) else {
        fatalError("Smoke node not found")
    }

    // 1. Remove the old smoke particle from the smoke node
    smokeNode.removeAllParticleSystems()

    // 2. Add fire particle to smoke node
    let fireParticle = SCNParticleSystem(named: "art.scnassets/fire.scnp", inDirectory: nil)
    smokeNode.addParticleSystem(fireParticle!)

    // 3. Give rocket physics animation capabilities
    rocketNode.physicsBody = SCNPhysicsBody(type: .dynamic, shape: nil)
    rocketNode.physicsBody?.isAffectedByGravity = false
    rocketNode.physicsBody?.damping = 0.0
    rocketNode.physicsBody?.applyForce(SCNVector3(0,100,0), asImpulse: false)
}
Let's examine exactly what we're doing each of these steps:
- After getting the nodes that are tied to the rocket and the smoke particle generator, we remove the old smoke particle generator. Why? Because our rocket will have fire instead of smoke when it gets launched!
- We load the fire particle asset and add that as the new particle generator to our smoke node.
- We modify some properties of the physicsBody of the rocket to allow it to fly up. We create a dynamic physics body to allow the rocket to be affected by forces. We then disable the rocket being affected by gravity (allowing it to continue flying at a constant speed, because naturally gravity slows any object that is being launched into the sky). We set damping to "0" to prevent air resistance from slowing our rocket down. Finally, we apply force (or move) the rocket up in the direction of the vector given ("0" in x and z, so only moving up in the y direction at "100").
Now let's run the app again. This time, go outside where you might have some space to see the rocket entirely — preferably an area where the ground is well lit and textured. Once you start seeing a group of feature points, tap once to plant the rocket anywhere. You should start to see the smoke being generated at its tail. Double tap anywhere to launch the rocket. You should notice the smoke particle being replaced by the fire particle. Walk around once you've launched the rocket and continue looking up in that direction. You should continue to see the rocket flying up even if you're farther away from the launch spot. Thanks to world tracking, ARKit is able to render a 3D object based on the location and tracking data it gets from the device. In essence, ARKit always knows where your device is related to the 3D object you added into the AR world.
Your launch should look something like this:
Checkpoint: Your entire project at the conclusion of this step should look like the final Step 6 code on my GitHub.
What We've Accomplished
Good job! You were successfully able to launch a rocket into the sky. Let's go over what you learned from this tutorial: placing a rocket on the ground with the help of horizontal plane detection and hitTest, adding smoke and fire particles to the rocket, adding physics animations to be able to launch the rocket, and being able to track your rocket after launch thanks to world tracking.
If you need the full code for this project, you can find it in my GitHub repo. I hope you enjoyed this ARKit tutorial designed to give you a path to the (virtual) stars. If you have any comments or feedback, please feel free to leave it in the comments section. Happy coding!
- Follow Next Reality on Facebook, Twitter, Instagram, and YouTube
- Sign up for our new Next Reality newsletter
- Follow WonderHowTo on Facebook, Twitter, Pinterest, and Google+
Cover image and screenshots by Ambuj Punn/Next Reality


Comments
Be the first, drop a comment!