For its latest take on augmented reality-infused playsets, Lego is giving the young, and the simply young at heart, its twist on the viral lipsync format made popular by TikTok with Lego Vidiyo.
The game remixes TikTok's video creation and curation features with a music business simulation that brings your playsets into the action. But, if you're going to make it anywhere in the music business, kid, you'll need a manager. Or, someone to guide you through the scene. I can do that for you, and I won't even ask for a percentage of your earnings.
So, here we go, let's get started with Lego Vidiyo.
Step 1: Install the App
To get started, all you need is the Lego Vidiyo app. If you want to expand the experience further down the line, you'll need to buy a Vidiyo Beatbox or Bandmates playset.
You'll also need a smartphone or tablet that is capable of running ARKit for iOS or ARCore for Android. These are the toolkits that enable apps to leverage the sensors of your mobile device to display AR content.
- For iOS, this means, at minimum, an iPhone 6S, 6S Plus, or SE (first generation), an iPad (fifth generation), iPad Pro (second generation), iPad Air (third generation), or iPad Mini (fifth generation), or an iPod touch (seventh generation). You'll also need to be running at least iOS 12.1.
- For Android, your device should be running Android 7.0 or later and be Google Play Store certified. Google maintains a list of ARCore supported devices to check against.
Step 2: Set Up the App
Upon opening the app, you'll learn that the app will eventually need to download approximately 320 MB of additional data. You can put this off until later, which means the app will download new content when it needs to. Or, you can just rip off the bandaid now and download the full packet now. Your choice.


After that, press play on the splash screen to proceed. Next, the app will ask for your birth year. Swipe the slider to the left until the right year comes up, then tap "Confirm" to proceed.
Finally, you'll need to consent to at least one data collection policy. One policy concerns necessary data for the app to function. The other policy is for experience data, which is optional but will help developers improve the app. Make your decisions, then tap the "Save settings" button to continue.


Step 3: Start Your Band
After flipping your device into landscape mode and watching a quick intro video, you'll need to grant camera permissions to the app, which are necessary for the AR experience. Hit the play button, and then confirm permissions in the pop-up window.

Before the fun part begins, you'll need to confirm whether to start with a digital bandmate, or scan a playset. For the purposes of this guide, we'll start with the former; you'll have the chance to scan in physical toys later on.

Now, you're set to begin your rock star experience. Select the base Minifigure, then tap the play button to continue. After a short loading screen, you'll begin to customize your avatar. Tap play again to bring your character to life and proceed to the band naming process.

Band name selection is based on randomly-generated combinations of relatively unrelated words that sound like they could be band names. If you don't like the first one, hit the refresh icon to the left for another option. Repeat until you land on something palatable, then press play.

Step 4: Film Your First Video
You haven't even written a song yet, but you're already filming a music video? You must be a big deal.
First, you'll be presented with three warnings on safe AR play. Tap play to confirm that you understand.

Now this is where ARKit/ARCore comes into play. As your camera view appears, you'll see digital overlays with dots showing where the app has identified a flat surface along with three circles where your band members will set. When you've found a spot with enough room for the band, the circles will turn from red to green. (In real life, your band will just have to squeeze into whatever space the venue gives you.)

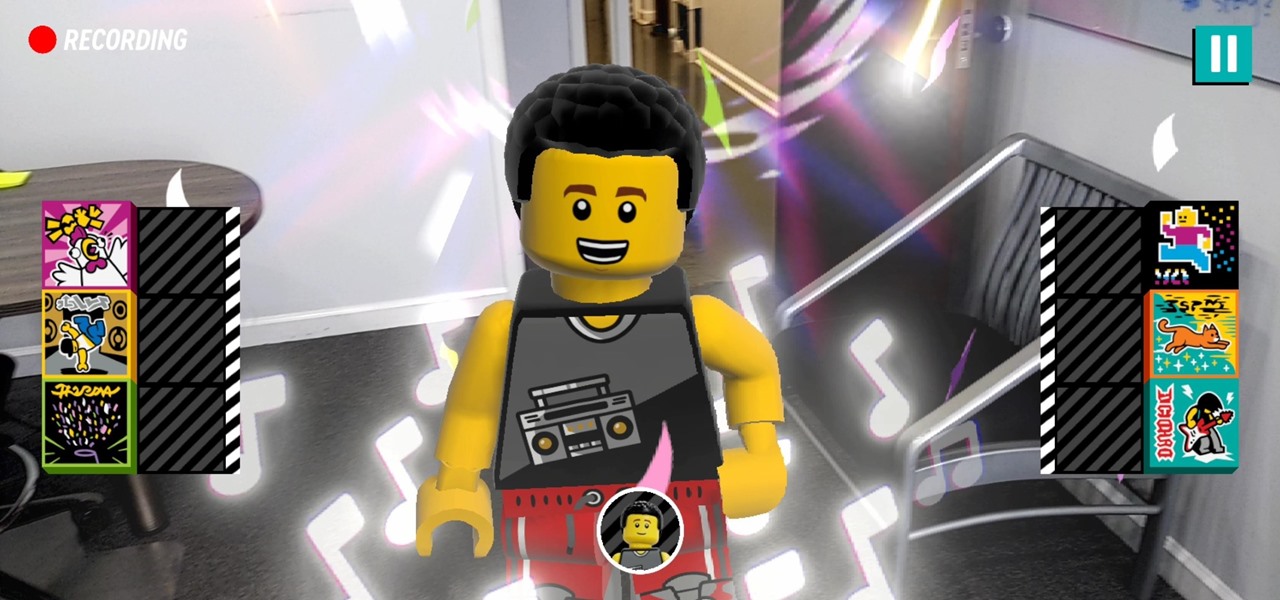
With the stage set, tap play to begin capturing the band's performance. Six tiles will appear on either side of the screen, along with a button at the bottom for your band member. Tap the tiles to enable special effects; some stay on until you tap the "x" to disable them, others do their trick and terminate on their own. Tap the band member icon to launch a special dance move.

Once your performance is complete, you'll receive your scores. You'll earn in-game currency for accomplishing certain objectives. Good job!
Step 5: Explore the Game
Now that you've created your first video, the game opens up for you (and, for now, the app returns to portrait mode). On the home screen, you'll find five options: Social, Gallery, Play, Bands, and Scan.
Social is the TikTok-like part of the game. The For You section is a curated feed of performances from other players that you can watch, react to, or comment on, along with the occasional recommended song for your next performance. The Discover section is a grid of videos by others that you can scroll through or filter with the tags at the top.
The Activities section is the challenge portion of the game, where you can claim rewards in the form of in-game coins for filming performances that fulfill the stated objectives, such as using as many BeatBits as you can or playing along to a hit song.


Gallery contains the content you've captured, organized under videos, photos, and shared. You can share any of the videos or photos you've created to the Vidiyo network, but you'll need to log into an existing Lego account or create a new one.


Sharing photos is straightforward, but, for videos, you'll have to trim your video down to five, 10, or 20 seconds, using the timeline to select your favorite part. Before sharing your content, you can add an emoji message and add up to six tags about your video.


Play is where you generate new videos. First, you'll select your song, with six free options under Daily Mix and more songs that you've unlocked by scanning a Bandmate that you've acquired. Then, you'll select your band (at this point, you'll have one option, but that can change shortly). Then press play to continue as you did in Step 4.
Bands is where you manage your performers, and there's a lot going on here. You'll have your default band already, and you can tap it to customize it and view its performance stats.


In the band editor screen, tap the Customize button to give your band members a new look with items in your inventory or purchase new accessories from the store (which is where the coins you earned in Step 4 come into play).


Tap the band name to remix its name with the name generator (you can lock words you like and spin for new ones) and pick a logo style.


Band layout enables you to adjust how the band appears on stage, with backup dancers and risers among the options.


You can also do a photoshoot, with options for poses, backgrounds, filters, and band logos available, with photos collected in the Gallery.


Finally, you can manage the band members by adding performers from your roster or jumping the Scan mode.
Scan is where you'll need to have a playset in your possession. Even if you don't have one yet, you can preview the available bandmates, and even preview its moves with the audition mode.
I haven't had the opportunity to scan figurines in yet, but the process is very savvy so as to prevent people from just scanning photos of the figures. You'll need to affix the Bandmate on top of the stage it comes with, and place the BeatBits tiles on the pegs in front in order to get the proper configuration to scan the character and effects into the game.


All in all, it's an intriguing approach to cater to kids who are perhaps too young to actually have a TikTok account. Moreover, it's a contrasting aesthetic from the fantasy and adventure lineups and licensed properties that Lego typically sells. Add in some augmented reality magic, and Lego may have something here.
Just updated your iPhone? You'll find new features for Podcasts, News, Books, and TV, as well as important security improvements and fresh wallpapers. Find out what's new and changed on your iPhone with the iOS 17.5 update.



















Be the First to Comment
Share Your Thoughts