


In our last ARKit tutorial, we learned how to measure the sizes of horizontal planes. It was a helpful entryway into the arena of determining spatial relationships with real world spaces versus virtual objects and experiences.
This time around, we'll dive into a slightly different area that touches upon another aspect of measuring in augmented reality.
What Will You Learn?
In this tutorial, we'll learn how to measure the distance between any two points on a horizontal plane, allowing you to measure anything on a flat surface using an iPad or iPhone by using ARKit.
If you haven't already done so, take a look at this past tutorial to learn how to measure the sizes of horizontal planes.
Minimum Requirements
- Mac running macOS 10.13.2 or later.
- Xcode 9.2 or above.
- A device with iOS 11+ on an A9 or higher processor. Basically, the iPhone 6S and up, the iPad Pro (9.7-inch, 10.5-inch, or 12.9-inch; first-generation and second-generation), and the 2017 iPad or later.
- Swift 4.0. Although Swift 3.2 will work on Xcode 9.2, I strongly recommend downloading the latest Xcode to stay up to date.
- An Apple Developer account. However, it should be noted that you don't need a paid Apple Developer account. Apple allows you to deploy apps on a test device using an unpaid Apple Developer account. That said, you will need a paid Developer account in order to put your app in the App Store. (See Apple's site to see how the program works before registering for your free Apple Developer account.)
Download the Assets You Will Need
To make it easier to follow along with this tutorial, I've created a folder with the required 2D assets and Swift file needed for the project. These files will make sure that you don't get lost in this guide, so download the zipped folder containing the assets and unzip it.
Set Up the AR Project in Xcode
If you're not sure how to do this, follow Step 2 in our post on piloting a 3D plane using hitTest to set up your AR project in Xcode. Be sure to give your project a different name, such as NextReality_Tutorial5. Be sure to do a quick test run before continuing on with the tutorial below.
Import Assets into Your Project
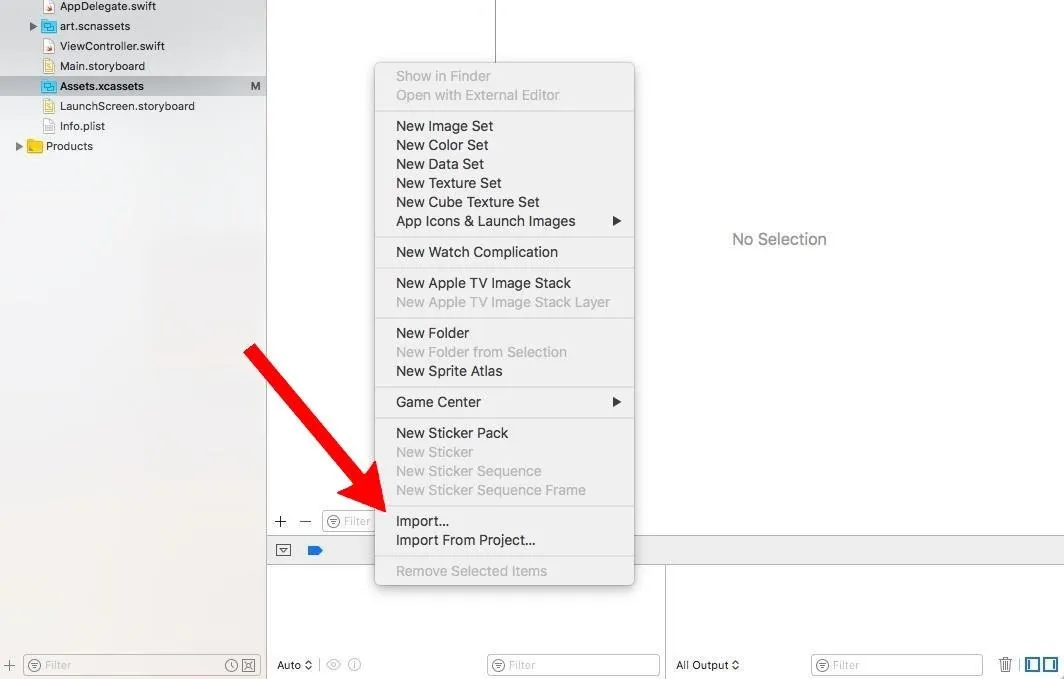
In the project navigator, click on the "Assets.xcassets" folder. We'll be adding our 2D images here. Then, right-click on the left pane of the area in the right side of the project navigator. Choose "Import" and add the "overlay_grid.png" file from the unzipped Assets folder.
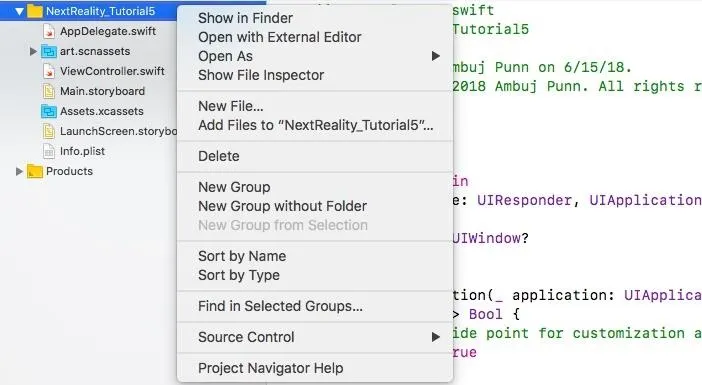
Next, once again in the project navigator, right-click on the yellow folder for "NextReality_Tutorial5" (or whatever you named your project). Choose the "Add Files to 'NextReality_Tutorial5'" option.
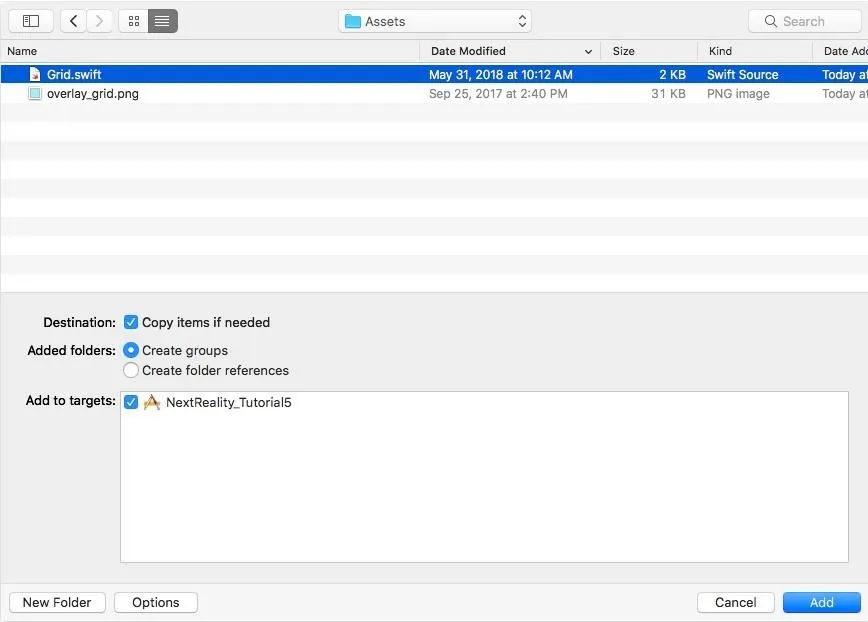
Navigate to the unzipped "Assets" folder and choose the "Grid.swift" file. Be sure to check "Copy items if needed" and leave everything else as is. Then, click on "Add."
"Grid.swift" should now be added into your project, and your project navigator should look something like this:
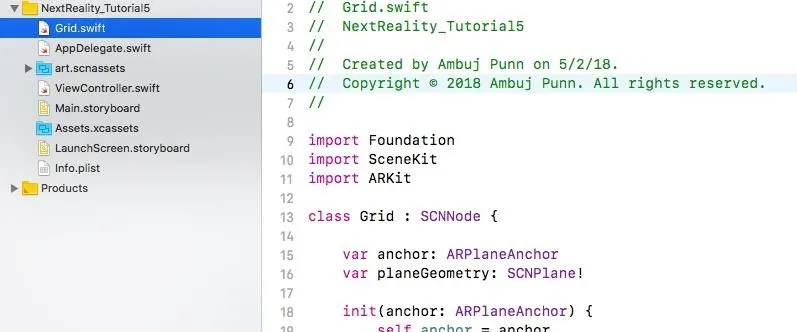
This file will help render a grid for every horizontal plane that ARKit detects.
Place a Grid to Show Detected Horizontal Planes
To quickly go over ARKit's general plane detection capabilities, take a look at our tutorial on horizontal plane detection.
Open the "ViewController.swift" class by double-clicking it. If you want to follow along with the final Step 4 code, just open that link to see it on GitHub.
In the "ViewController.swift" file, modify the scene creation line in the viewDidLoad() method. Change it from this:
let scene = SCNScene(named: "art.scnassets/ship.scn")!To this, which ensures we are not creating a scene with the default ship model:
let scene = SCNScene()Next, find this line at the top of the file:
@IBOutlet var sceneView: ARSCNView!Under that line, add this line to create an array of "Grid's" for all horizontal planes detected:
var grids = [Grid]()Copy and paste the following two methods as listed below to the end of the file before the last curly bracket ( } ) in the file. These methods will allow us to add our Grid on the horizontal planes detected by ARKit as a visual indicator.
// 1.
func renderer(_ renderer: SCNSceneRenderer, didAdd node: SCNNode, for anchor: ARAnchor) {
    let grid = Grid(anchor: anchor as! ARPlaneAnchor)
    self.grids.append(grid)
    node.addChildNode(grid)
}
// 2.
func renderer(_ renderer: SCNSceneRenderer, didUpdate node: SCNNode, for anchor: ARAnchor) {
    let grid = self.grids.filter { grid in
        return grid.anchor.identifier == anchor.identifier
    }.first

    guard let foundGrid = grid else {
        return
    }

    foundGrid.update(anchor: anchor as! ARPlaneAnchor)
}
Let's quickly go over what's happening in these two methods:
- The didAdd() is called whenever a new node is added into the ARSCNView. Here, we take the detected ARPlaneAnchor and add it as our Grid object, which adds the grid image we imported to any plane detected.
- The didUpdate() is called whenever newer ARPlaneAnchor nodes are detected, or when the plane is expanded. In that case, we want to update and expand our grid as well. We do that here by calling update() on that specific Grid.
Now, let's enable feature points. Under this line in viewDidLoad():
sceneView.showsStatistics = trueAdd:
sceneView.debugOptions = ARSCNDebugOptions.showFeaturePointsNext, let's turn on horizontal plane detection. Under this line in viewWillAppear():
let configuration = ARWorldTrackingConfiguration()Add:
configuration.planeDetection = .horizontalThis is very important! It will ensure that ARKit is able to detect horizontal, flat geometric planes in the real world. The feature points will allow us to see all the 3D points ARKit is able to detect.
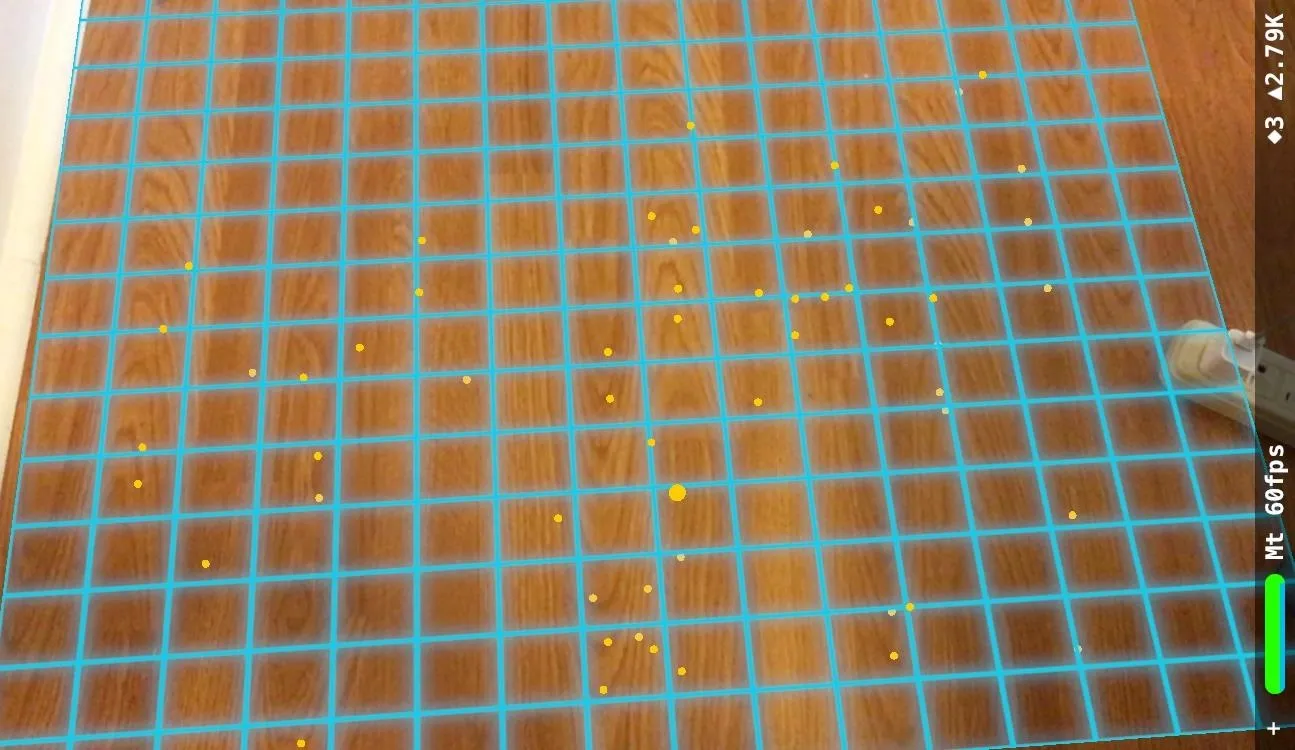
Run your app on your phone and walk around. Focus on a well lit area on the ground, and you should be able to see blue grids appear whenever a horizontal plane is detected:
Checkpoint: Your entire project at the conclusion of this step should look like the final Step 4 code on my GitHub.
Use the hitTest to Place Markers on the Detected Horizontal Planes
Before you begin this step, I strongly recommend that you take a look at our hitTest tutorial to go over the fundamentals of how the hitTest works. In this step, we'll place start and end markers between our two points.
If you want to follow along with the final Step 5 code, just open the link to see it on GitHub.
First, add a gesture recognizer to the end of the viewDidLoad() method, as shown below. Once any tap happens on the screen, the tapped() method will be called.
let gestureRecognizer = UITapGestureRecognizer(target: self, action: #selector(tapped))
sceneView.addGestureRecognizer(gestureRecognizer)
Now, add the tapped(), as shown below, at the end of the file, but before the last curly bracket (}).
@objc func tapped(gesture: UITapGestureRecognizer) {
    // Get 2D position of touch event on screen
    let touchPosition = gesture.location(in: sceneView)

    // Translate those 2D points to 3D points using hitTest (existing plane)
    let hitTestResults = sceneView.hitTest(touchPosition, types: .existingPlane)

    guard let hitTest = hitTestResults.first else {
        return
    }
}
Currently, this code just translates the 2D point tapped on the screen to a 3D point on a detected plane through the use of hitTest. We'll get back to adding more functionality to this in a later step.
We need multiple pairs of points to be added onto the horizontal planes. Each pair will have a start and end point. In order to do this, we need to track which point is being added based on the order of the taps. The first tap is for the start point and the second tap is for the end point. After that, it resets, allowing more pairs to be added. Let's get started with this.
First, declare and initialize this variable, keeping track of the number of taps right after declaring the variable for the Grid array we created in the previous step:
var numberOfTaps = 0Next, let's increment this variable every time a tap happens, or, in other words, when tapped() is called. Add this to the beginning of the tapped() method:
numberOfTaps += 1Now, we need logic to decide whether it was the first tap or second. Based on that, we'll insert a red marker or a green marker. Add this to the end of the tapped() method:
// If first tap, add red marker. If second tap, add green marker and reset to 0
if numberOfTaps == 1 {
    addRedMarker(hitTestResult: hitTest)
}
else {
    // After 2nd tap, reset taps to 0
    numberOfTaps = 0
    addGreenMarker(hitTestResult: hitTest)
}
In the code above, we made sure to add a red marker if it was the first tap, and a green marker if it was the second tap. Next, we'll reset the variable numberOfTaps to 0 after the second tap happens to allow new pairs of points to be added.
Lastly, let's define the methods that add our markers. Add the following code below after the tapped() method, but before the last curly bracket in the file:
func addRedMarker(hitTestResult: ARHitTestResult) {
    addMarker(hitTestResult: hitTestResult, color: .red)
}

func addGreenMarker(hitTestResult: ARHitTestResult) {
    addMarker(hitTestResult: hitTestResult, color: .green)
}

func addMarker(hitTestResult: ARHitTestResult, color: UIColor) {
    let geometry = SCNSphere(radius: 0.01)
    geometry.firstMaterial?.diffuse.contents = color

    let markerNode = SCNNode(geometry: geometry)
    markerNode.position = SCNVector3(hitTestResult.worldTransform.columns.3.x, hitTestResult.worldTransform.columns.3.y, hitTestResult.worldTransform.columns.3.z)

    sceneView.scene.rootNode.addChildNode(markerNode)
}
Here, our two methods, addRedMarker() and addGreenMarker(), call the helper method addMarker() to add both the markers. In addMarker(), we're creating a SCNSphere instance with the passed in color and placing it based on the hitTest result to identify the point where we tapped.
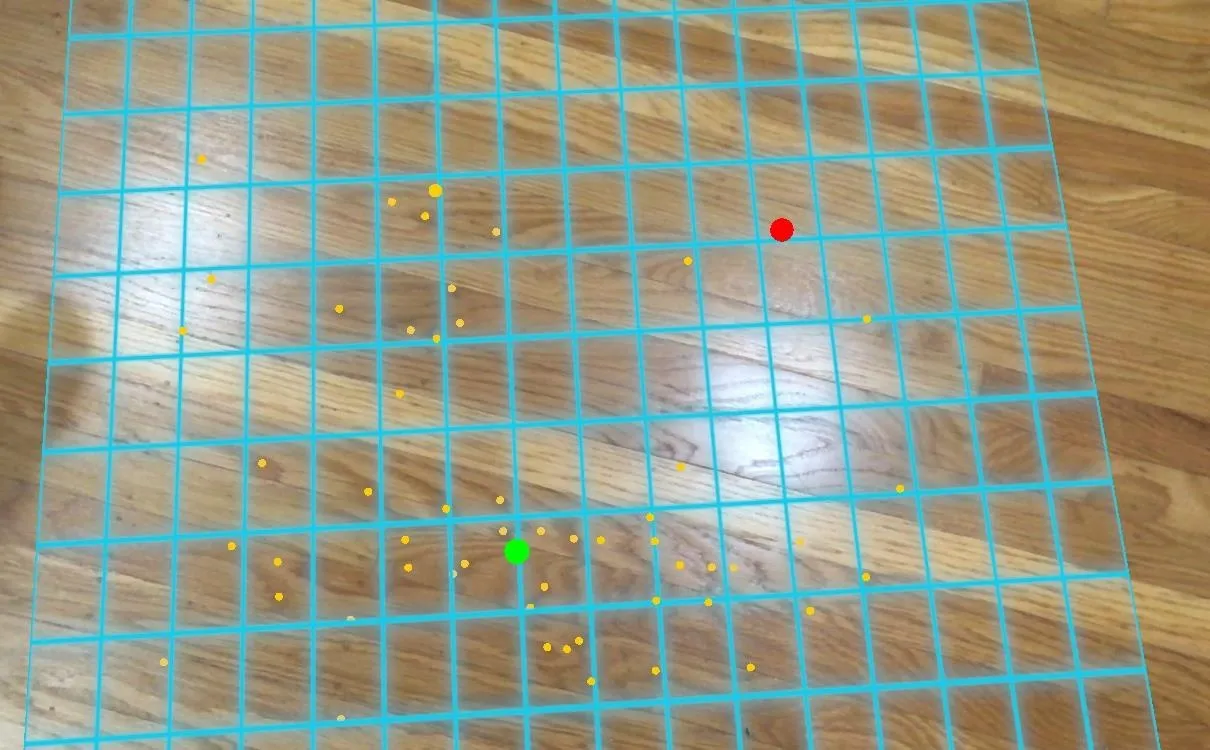
Now, deploy and run the app. Move your phone around and focus on a well-lit area on the ground. Once you see the detected horizontal planes, tap anywhere on them to place your red and green markers. You should see something like this:
Checkpoint: Your entire project at the conclusion of this step should look like the final Step 5 code on my GitHub
Draw a Line & Calculate the Distance Between the Two Points
In this step, we'll do some simple math to calculate the distance between the two points we added in the last step, and use some SceneKit API's to draw a line between the two.
If you want to follow along with the final Step 6 code, just open the link to see it on GitHub.
Ok, so now we need to be able to track where our two points are being added. Let's make variables for them. Add the following code after declaring the numberOfTaps variable from the previous step:
var startPoint: SCNVector3!
var endPoint: SCNVector3!
Next, store the values of the hitTest results into those variables. After this line in the tapped():
if numberOfTaps == 1 {Add this line:
startPoint = SCNVector3(hitTest.worldTransform.columns.3.x, hitTest.worldTransform.columns.3.y, hitTest.worldTransform.columns.3.z)Subsequently, after this line in the tapped():
// After 2nd tap, reset taps to 0
numberOfTaps = 0
Add this line:
endPoint = SCNVector3(hitTest.worldTransform.columns.3.x, hitTest.worldTransform.columns.3.y, hitTest.worldTransform.columns.3.z)We're simply just storing the values of the hitTest result into these two variables for each marker.
Now, let's add an extension to the SCNGeometry type. Add the following code at the top of the file right after this line that imports ARKit: import ARKit
extension SCNGeometry {
    class func lineFrom(vector vector1: SCNVector3, toVector vector2: SCNVector3) -> SCNGeometry {
        let indices: [Int32] = [0, 1]

        let source = SCNGeometrySource(vertices: [vector1, vector2])
        let element = SCNGeometryElement(indices: indices, primitiveType: .line)

        return SCNGeometry(sources: [source], elements: [element])
    }
}
Here, we are adding custom functionality to SCNGeometry to allow us to draw a line from one point to another.
Next, right after we added the green marker at this line:
addGreenMarker(hitTestResult: hitTest)Add this line of code:
addLineBetween(start: startPoint, end: endPoint)This method will help us actually add the line to our ARSCNView and show it on the screen. Let's add the addLineBetween() at the bottom of the file, but before the last curly bracket:
func addLineBetween(start: SCNVector3, end: SCNVector3) {
    let lineGeometry = SCNGeometry.lineFrom(vector: start, toVector: end)
    let lineNode = SCNNode(geometry: lineGeometry)

    sceneView.scene.rootNode.addChildNode(lineNode)
}
This method takes in the start and end point in the form of vectors (SCNVector3) and adds the generated line in the form of a SCNNode to the scene. In other words, we should see a line between our two points now!
Next, we need a way to calculate the distance between two points. Right after adding the code for our SCNGeometry extension in the previous step, add the following code:
extension SCNVector3 {
    static func distanceFrom(vector vector1: SCNVector3, toVector vector2: SCNVector3) -> Float {
        let x0 = vector1.x
        let x1 = vector2.x
        let y0 = vector1.y
        let y1 = vector2.y
        let z0 = vector1.z
        let z1 = vector2.z

        return sqrtf(powf(x1-x0, 2) + powf(y1-y0, 2) + powf(z1-z0, 2))
    }
}

extension Float {
    func metersToInches() -> Float {
        return self * 39.3701
    }
}
Here, we are adding two extensions. The first is adding custom functionality to the SCNVector3 type by enabling us to calculate the distance between the two points with the help of the distance formula. The second is adding custom functionality to the Float type by enabling us to convert meters to inches.
Next, right after we've added the logic to call our method that draws a line between the two points in the last step:
addLineBetween(start: startPoint, end: endPoint)Add this line:
addDistanceText(distance: SCNVector3.distanceFrom(vector: startPoint, toVector: endPoint), at: endPoint)Lastly, let's add the addDistanceText() method at the bottom of the file, but before the last curly bracket:
func addDistanceText(distance: Float, at point: SCNVector3) {
    let textGeometry = SCNText(string: String(format: "%.1f\"", distance.metersToInches()), extrusionDepth: 1)
    textGeometry.font = UIFont.systemFont(ofSize: 10)
    textGeometry.firstMaterial?.diffuse.contents = UIColor.black

    let textNode = SCNNode(geometry: textGeometry)
    textNode.position = SCNVector3Make(point.x, point.y, point.z);
    textNode.scale = SCNVector3Make(0.005, 0.005, 0.005)

    sceneView.scene.rootNode.addChildNode(textNode)
}
This method simply prints out the distance between the two points next to the end point.
Ok, what are you waiting for? Deploy and run your app! Walk around and focus on a well-lit area on the ground. Once you place two points on the detected horizontal planes, you should see a line being drawn between the two points with the distance right next to the end point (green marker)...something like this:
What We've Accomplished
Great job! You have successfully learned how to measure between two points on a horizontal plane using ARKit. Next time you need to measure a flat surface, try using this app you created instead of a tape measure.
Let's go over what you learned from this tutorial: placing a grid over a detected horizontal plane, using the hitTest to create start and end markers for both points, and creating a custom extension to calculate the distance between the two points and drawing a line between them.
If you need the full code for this project, you can find it in my GitHub repo. I hope you enjoyed this tutorial on ARKit. If you have any comments or feedback, please feel free to leave it in the comments section. Happy coding!
- Follow Next Reality on Facebook, Twitter, Instagram, and YouTube
- Sign up for our new Next Reality newsletter
- Follow WonderHowTo on Facebook, Twitter, Pinterest, and Google+
Cover image & screenshots by Ambuj Punn/Next Reality


Comments
Be the first, drop a comment!